
Compression. It’s probably one of the most misunderstood and hardest to understand tools in all of live sound and mixing. It’s a tool that can be used to make our mixes “big” and “punchy” and “glued together”, but we often hear warnings to not over-compress our mixes. Where is the middle ground that will make the mix of our instruments and vocals sound big, but not squashed? For that matter, what exactly is compression? Let’s take a look.
First, let’s talk about what compression is exactly. Compression simply means to make smaller, or to squeeze something so it fits in a smaller area. So we can define dynamic range compression as reducing the difference between the loud and soft parts of a sound. What does that mean for our music and the ears of our congregation? It means after compression, the mix will be more consistent and an even volume.
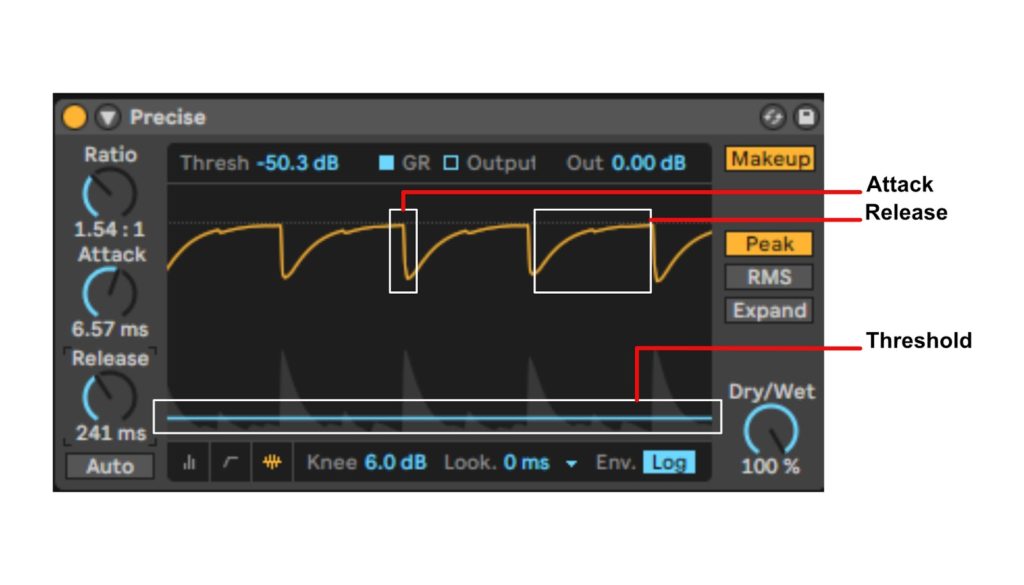
Now that we have a better understanding of what compression is, I want to talk about the 3 main areas used to manipulate compression: threshold, attack, and release. (Because compression can be tough to conceptualize, I’ve attached a graphic at the bottom to help visualize these different areas.)
I want to start with threshold because all of the other functions build and depend on this. The threshold is the level that a signal must cross for the compressor to activate. Once you cross that threshold, that’s when compression actually kicks in and will start to turn down (or compress) that signal. The amount of compression that kicks in is defined by the ratio. Before the threshold, no gain reduction happens, and once that threshold is crossed, the ratio says how much reduction will happen. You’ll see ratios listed as numbers like 2:1 or 4:1 or 20:1 and so on. What those numbers indicate is the ratio of input to output. For a quick example, let’s look at a threshold of 100dB and a 2:1 ratio. For every decibel over 100 we go, the ratio will output a reduced, compressed signal. So if we put in a 112dB signal, our compressor will then output a 106dB signal. In the same situation but with a 4:1 ratio, our compressor will output a 103dB signal.
Next we’ll look at attack and release times. These are pretty simple concepts, but they’re REALLY important to your sound. I often hear that attack and release are how long it takes before compression kicks in, almost like a delay time. In reality, attack is how quickly the compressor reacts in reducing gain once the threshold is crossed, and release is how long it takes the compressor to stop reducing gain when the signal gets back below the threshold. Why would we want to change this? For attack time, think about the initial hit of a snare drum. We often want that initial crack of the snare and then we use the compressor to help balance out the later part of the hit. To allow the first part of the signal to be unaffected by the compressor, we can use a slightly slower attack time. An example for changing the release time could be to help smooth to a sustained vocal note by using a longer release time. Your compression would reduce the initial loud volume and then the longer release time would return the vocal to normal as the note dies off, making it seem like a longer, more evenly sustained note.
Compression can feel like a tough concept to grasp at first, but with a better understanding of the different pieces that make up our compressors, we can make our instruments sound more balanced and our mixes more full.